Why is My Roku Remote Blinking and Not Working?
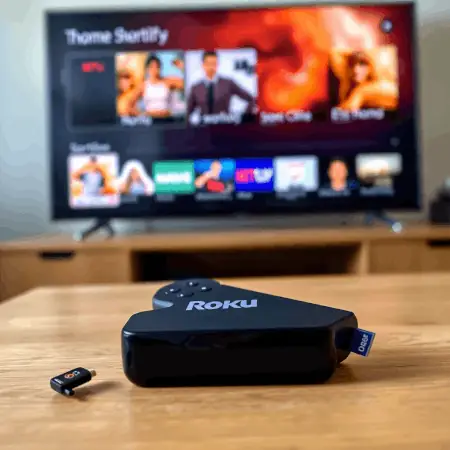
Roku offers many streaming devices and TVs at different prices, so there’s something for everyone. No matter which Roku device you pick, it comes with a Roku remote.
If your original Roku remote stops working, you can easily buy a replacement from the Roku accessories store or online stores like Amazon.
If you use a Sonos Playbar with your Roku, check out guides on fixing volume control issues between the Roku remote and Sonos Playbar for smooth use.
Also, remember to update your remote’s firmware regularly to avoid problems. If your Roku remote isn’t working well, updating its firmware might fix it.
Why My Roku Remote Isn’t Working
People use Roku remotes for both TVs and streaming devices. If I can’t control my TV or streaming device, the remote might be the problem. This often happens with popular brands like Samsung and TCL TVs.
Whether I’m using a Roku set-top box or streaming, sometimes the remote stops working. It’s likely that the remote got unpaired due to pairing issues.
Let’s look at how to fix a Roku remote that isn’t working. Can Roku remotes break? Like any electronic device, Roku remotes can stop working suddenly. So, why won’t my Roku remote work?
Many people ask, “Why doesn’t my TV respond to the remote?” If a regular TV or streaming device responds, then the remote is probably fine. But if you’re controlling a Roku set-top box or streaming device, there are specific problems to check.

Roku Remote Not Working With New Batteries
If you’ve put in new batteries but the remote still doesn’t work, try this:
1. Put your streaming device into pairing mode.
- Unplug the power cord from the streaming device.
- Wait at least 5 seconds.
- Plug the power cord back in.
- Wait for the device to turn on and show the home screen. Within 30 seconds of seeing the main screen, start pairing your Roku voice remote.
2. Put the voice remote into pairing mode.
- Take off the battery cover on the back of the remote.
- Remove the batteries.
- Wait about 5 seconds, then put the batteries back in. Make sure they’re new and placed correctly.
- If your remote has a pairing button, press and hold it for 5 seconds until the light starts flashing.
- If there’s no pairing button, press and hold the Home and Back buttons together for at least 5 seconds until the light blinks.
- Replace the batteries if no light comes on or if it blinks oddly.
Wait about 30 seconds for the remote to connect to your streaming device. When they connect, you’ll see a pairing message on your TV screen.
Turning Off the Power
Here’s a tip for turning off the power.
Start by unplugging your TV’s power cord for about 2 minutes. Also, unplug the HDMI cables from both the TV and the power supply.
- Press the Home button on your Roku remote.
- Scroll and select Settings.
- Choose System.
- Select Power.
- Pick System Restart to restart your Roku device.
This can help if you’re having trouble with your Roku remote batteries. Sometimes, it takes a few hours for the batteries to work again after this.
If you’re having problems with your Sonos system too, try resetting it to fix remote control or pairing issues.
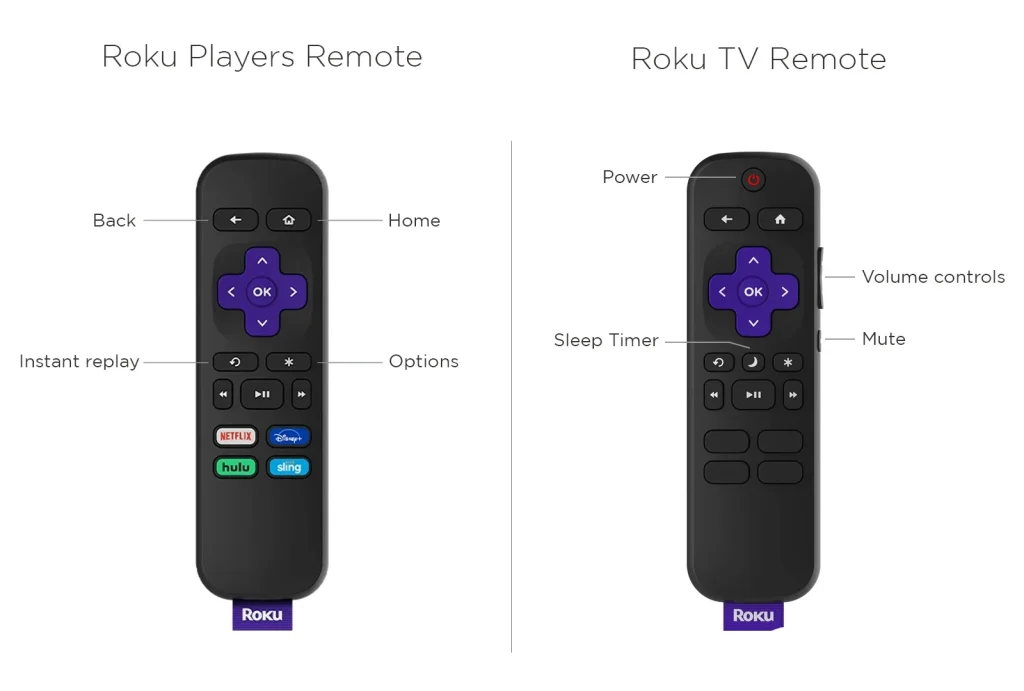
Identify Your Remote Type
First, find out if your remote uses infrared (IR) or connects via Wi-Fi. Knowing the difference helps ensure your remote works properly.
You can tell by looking at the buttons. Voice remotes have a button with a microphone or magnifying glass icon. If you don’t see these, it’s likely a basic Roku remote.
The Roku Voice Remote Pro has a USB port for easy charging.
Wi-Fi remotes don’t need to point directly at the TV, but IR remotes do and might need repairs if they stop working.
When setting up your TCL Roku TV remote, choose between Bluetooth (Wi-Fi) and infrared based on what suits you best.
Can Roku Remote Batteries Run Out of Power?
The most common reason a Roku remote stops working is a power issue, usually with the batteries. So, how often should you change the batteries?
Roku remotes need power to work, and they usually use AA or AAA batteries, or sometimes a rechargeable battery. Your TV or set-top box manual will explain how to charge or replace the batteries, similar to how you handle smartphone batteries.
Batteries generally provide about 3 volts and should last at least three months on one charge, often much longer. Typically, you can expect batteries to last about a year before needing replacement.
If your remote isn’t working, try basic troubleshooting first, especially if it doesn’t have voice features. If you need a new remote, look for compatible universal or replacement remotes for TCL Roku TVs and Sonos devices.
The Easiest Way to Fix the Problem is to Replace or Recharge the Batteries
If your Roku remote isn’t working, start by recharging or replacing the batteries. Fully charged batteries usually last three to four months, so if you’re having problems, it might be time for new ones.
If changing or charging the batteries doesn’t work, check inside the battery compartment for any corrosion. Corrosion can damage the contacts and may need cleaning or even a new remote.
You can also take your remote to a repair shop that handles remote repairs. Professionals can clean the contacts and check the batteries safely, especially if there’s heavy corrosion.
When replacing or recharging batteries, remember to check if third-party batteries are compatible with your Roku remote if you choose to use them.

Take a look: How to find the code for your universal TV remote.
Why My Roku Remote Isn’t Working
First, check that the batteries are new and placed correctly. Battery direction can be different in Roku remotes, so look at the diagram inside the battery compartment to make sure.
Taking out and reinserting the batteries might reset the remote’s connection. To fix this, remove the batteries, wait a few seconds, then put them back in. This should help your remote sync again with the Sonos app and work properly.
If the remote still doesn’t work, try re-pairing it with your TV. Point the remote at the TV and press the Back button to start pairing. For more help, look up guides on how to pair or re-pair your Roku remote with your streaming device.
How to Fix Your Roku Remote Using the Mobile App
If you’re not sure whether your Roku remote or device is the problem, try using the Roku mobile app as a remote control.
If the app controls your Roku, the remote is likely the issue. This is an easy way to troubleshoot remote problems.
The Roku app lets you control your device with your phone. Just download the app for iOS or Android, connect your phone to the same Wi-Fi as your Roku, and you’ll see a screen with buttons to navigate and control media.
However, using your phone as a remote isn’t always convenient—especially if you need to make calls or your battery runs low. If your Roku remote isn’t working well, like having volume control issues, it might be best to buy a new one. You can also consider a universal remote that works with devices like Sonos Playbar for more options.
If you think the remote’s infrared (IR) function isn’t working, test it by pointing it at your phone’s camera and pressing buttons—you should see a light if it’s working. Keep in mind that not all remotes work with TCL TVs, so check compatibility before buying a replacement.
What You Should Know Before Resetting
There are two types of Roku remotes:
- Advanced Roku remote
- Standard infrared remote
A standard infrared remote needs to be pointed directly at the device for it to work because it uses invisible infrared signals. This is important for it to work properly with your Roku player or TV.
You can only reset an advanced Roku remote. You don’t need to reset a standard infrared remote since it works with any compatible Roku player or TV. Just make sure to point it directly at the TV so the signals can reach it.
If your standard Roku remote isn’t working well, try taking out the batteries and putting them back in after a few seconds. This simple step can often fix the issue.
How to Reset the Roku Advanced Remote Control Settings
Resetting the Roku advanced remote can be tricky because it doesn’t have a reset button. Instead, it uses a pairing button that works similarly.
For Roku Voice Remote Pro
On the Roku Voice Remote Pro, the pairing button is on the back, near the bottom, since this model doesn’t have a regular battery compartment like other remotes. Other Roku remotes have their reset (pairing) button under the battery cover.
Why the Pairing Button Matters
To reset the Roku Voice Remote Pro, you need to use the pairing button correctly.
Difference Between IR Remote and Advanced Remote
The Roku IR remote doesn’t have advanced features like pairing. It works without connecting to a Roku device, so it offers basic control without needing to pair. This is an important difference between the IR remote and the advanced remote.
How to Identify Your Roku Remote Using the Pairing Button
To find out which remote you have, take off the battery cover on the back. If your remote is infrared, it won’t have a pairing button at the bottom. Advanced remotes have either one pairing button or a pairing button with a light. Knowing this helps you understand the remote’s features.
Also read: QLED vs. Neo QLED — Which TV tier fits your needs?
How to Check Your Roku Remote
- Take off the battery cover: Open it at the bottom and remove the batteries.
- Restart your Roku player: Unplug its power cable, wait 10 seconds, then plug it back in.
- Put the batteries back in once you see the Roku screen on your TV.
- Press and hold the pairing button near the batteries for 3-5 seconds until the light blinks.
If the light doesn’t blink, try again. If it still doesn’t work, replace or recharge the batteries.
What to Do if Your Roku TV Freezes
If your TV stops responding during this process:
- Turn off your Roku TV.
- Unplug it from the power outlet.
- Wait 10 to 20 seconds.
- Plug it back in and turn it on.
This will restart your TV and may fix any problems.
The pairing will take about 30 seconds. When done, a message will show up confirming your remote is ready to use—including with other devices like Sonos Playbar by pairing them together.
Troubleshooting Volume Control Issues
In some cases, you might encounter issues such as suddenly being unable to control your TV volume anymore with your remote. This can be frustrating, but there are potential solutions available online that can help address these problems. For instance, Apple’s support page offers some useful tips for troubleshooting such issues.
Additionally, if you’re using a Roku device and experiencing similar volume control problems, it’s worth noting that these issues can sometimes be resolved by making adjustments in your settings or by ensuring that your remote is properly paired with your device. You can find more insights into this topic on platforms like Reddit, where users share their experiences and solutions regarding such issues, as seen in this Reddit thread.
Differences Between Voice Remote Pro and Standard Remote Control
The Voice Remote Pro has a battery cover on the back and uses a built-in rechargeable battery. You can easily charge it by plugging a cable into the micro USB port under the fabric tag.
Roku says this remote can last about two months before needing a recharge. The pairing button is next to the micro USB port, not hidden under the battery cover.
To pair the Voice Remote Pro with your Roku device, hold down the home button until the connection menu appears. Then select ‘Remote Control’ on the screen and press the pairing button on the remote until the LED flashes green. This uses Wi-Fi to connect quickly and easily.
The remote connects wirelessly via Wi-Fi, so it doesn’t need to point directly at the device. If Wi-Fi connection fails, it still has an infrared transmitter to control your TV, soundbar, or Roku Express. This ensures you can control your devices even if other connections aren’t working.

Also read: HDMI ARC vs. TOSlink — What’s the difference in digital audio?
Other Ways to Fix a Roku Remote Not Working
If your Roku remote still doesn’t work after a reset, try other troubleshooting steps. You can use your phone’s camera to see if the remote is sending infrared signals, which helps check if it’s working. If you have trouble using your Roku remote with Sonos devices, see our guide on pairing the Roku remote with a Sonos soundbar.
If nothing fixes the problem, you might need to replace the Roku remote.
How to Install an HDMI Extension Cable for Your Roku Streaming Stick
When setting up your Roku streaming stick, it’s crucial to ensure that your streaming device works well with your TV. Sometimes, the remote might not function properly if it’s designed for a different streaming device.
A simple solution is to use an HDMI extension cable for your Roku streaming stick. This cable allows you to move the streaming stick away from the TV’s HDMI port, which can resolve connection problems. This is particularly useful if your Roku streaming stick is plugged directly into your TV.
If you want to control the volume of your Sonos Playbar using a TCL Roku TV remote, consider the placement of your devices as it can impact how effectively the remote works. If you encounter any issues, a quick restart of your streaming device might help. For more assistance and tips, don’t hesitate to visit the Roku Community Team forums.
How to Fix Your Roku Voice Remote by Checking Network Settings
Network problems that stop your Roku voice remote from working are uncommon but can happen. Before buying a new remote, it’s a good idea to check your network settings.
To fix this, try these steps:
- Restart your Roku remote.
- Make sure your Wi-Fi connection is strong and stable.
- If you’re also having trouble with Roku remotes controlling Sonos Playbar volume, confirm all devices are on the same Wi-Fi network.
If it still doesn’t work, try pairing your Roku remote again to reconnect it properly.

Also read: Try this method to fix frozen programs on your Vizio TV.
Is Your Roku Remote Too Hot?
If your Roku remote feels too hot to touch, it could mean the batteries are damaged. This is especially common if you use rechargeable batteries.
All batteries, including rechargeable ones, can get hot during use. If your remote feels very warm, replace the batteries right away to stay safe.
If your remote is charging, unplug it and put it on a fireproof surface. This helps keep the battery safe.
Some people switch the positions of their batteries in the remote to prevent corrosion and help the batteries last longer. This spreads out the wear on each battery evenly.
If your Roku remote isn’t working well or the voice feature isn’t responding, check the batteries first. Also, if needed, learn how to reset your Roku remote and device properly.
If you’re buying batteries for an Amazon Roku remote, make sure they match the required specs for best performance.
Replace Only as a Last Option
If your Roku remote isn’t working, try other fixes before replacing it. Check if the batteries are new and if the remote has a pairing button. If you still need a new remote, you can buy one anytime online, including from the official Roku website.
FAQs (Frequently Asked Questions)
How can I troubleshoot if my Roku remote is not working properly?
To troubleshoot a malfunctioning Roku remote, try pairing it in streaming device pairing mode by holding down the pairing button near the battery compartment until the LED blinks. Replace or reinsert batteries ensuring correct polarity, unplug your TV or streaming device for 2-20 minutes to reset, and restart the device through its settings menu. If issues persist, check network settings or consider using the Roku mobile app as an alternative control option.
What should I do if my Roku remote's batteries are corroded or damaged?
If you notice corroded contacts on your Roku remote's battery compartment, professional repair is recommended to avoid further damage. Additionally, if your remote overheats during charging or use, immediately replace the batteries and ensure you place the remote on a non-combustible surface while charging. Alternating batteries when inserting them can help distribute load evenly and prolong battery life.
How do I pair my Roku Voice Remote Pro with my device?
To pair the Roku Voice Remote Pro, press and hold the Home button until a connection menu appears on your TV screen. Select 'Remote Control' from this menu, then press the pairing button located next to the micro USB charging port until its LED flashes green. The remote connects wirelessly via Wi-Fi or infrared transmitter, enabling enhanced control features.
Can I reset my Roku remote if it stops responding?
Yes. For standard infrared remotes without a pairing button (infrared models), simply remove and reinsert the batteries to reset. For advanced remotes with a pairing button (including those with indicator lights), remove the battery cover, unplug your Roku receiver's power cable for 10 seconds, plug it back in, reinsert batteries, then hold down the pairing button near the battery compartment for 3-5 seconds until the LED blinks to complete resetting and pairing.
Where can I purchase replacement Roku remotes and accessories?
Replacement Roku remotes and accessories, such as HDMI extension cables, are available for purchase on the official Roku website. These accessories help resolve issues like HDMI connector problems caused by streaming devices connected directly to TV HDMI ports and ensure seamless operation of your Roku streaming setup.

I’ve been having trouble with my Roku remote lately, and your post gave me some great insights! I hadn’t thought about changing the batteries or checking for interference from other devices. I’ll definitely try those tips. Thanks for sharing!